

QuickBooks users occasionally experience errors related to PDF files or printer-related issues. The error related to the PDF file makes it impossible for the user to create the PDF file. When producing, mailing, or printing a report, this PDF-related error frequently occurs. Also, while making use of an old Microsoft XPS Document Writer driver, this error may get displayed. This article will familiarize you with the several reasons that provoke QuickBooks cannot create PDF file error, as well as the necessary fixes related to it. Make sure to read this article from beginning to end in its entirety.

What incites QuickBooks Cannot Create PDF File error in QuickBooks?
There are numerous factors that could cause this mistake. The following are some of the main causes of this error:
- Some problems with the driver files may lead to the PDF file error.
- Installation problems with PDF Converter may also provoke the error.
- The inability of the printer device to print.
- The inactivity of QuickBooks Desktop or offline status of the PDF Converter.
- Last but not least, connectivity problems may also provide impetus to this QuickBooks error.
Solutions to rectify QuickBooks Cannot Create PDF File Error
The error QuickBooks cannot create PDF File has a number of solutions to fix. They consist of the following:
Solution 1: Employing the QuickBooks PDF & Print Repair Tool
You can correct issues involving PDF files by using the QuickBooks(QB) PDF & Print Repair tool. The QuickBooks Tool Hub is where you may access this tool. Follow these instructions to make use of this tool:
- Download and install QuickBooks Tool Hub initially.
- Once the installation is complete, launch the tool and select the Program Problems tab.
- The QuickBooks PDF & Print Repair Tool needs to be chosen thereafter.
- Wait for the scan to be finished before fixing any PDF errors there may have been.
- Try creating and printing the document in PDF format once more.
- Navigate to the following solution if the approach doesn’t work to address the error code.
Solution 2: Configuring permissions related to the Temporary Folder
Follow the instructions below to restore the temp folder permissions:
- Open the Run command window by concurrently pressing the Win and R keys.
- Type %TEMP into the Run window box and hit the Enter key.
- To access the Properties menu, right-click anywhere in the empty space of your temporary folder and choose it.
- Next, select the Security menu item.
- Ensure that every group and user name is set to the Full Control option in the Security option.
- Now, reset the Temp Folder permissions
- Next, try reopening QuickBooks Desktop to see if the problems with PDF creation have been resolved.
Solution 3: Reinstalling the Microsoft XPS
Comply with the actions listed below to reinstall Microsoft XPS:

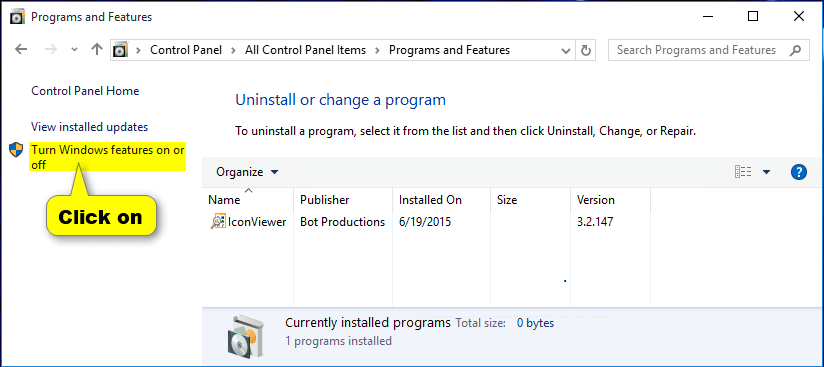
- In the beginning, use the start menu to find the Control Panel.
- After that, opt for uninstall/change option under the system group.
- Thereafter, choose the Turn on Windows features option.
- Ensure that the XPS viewer and services are both enabled. To replicate this, take these actions:
- Select the OK option after checking the boxes next to XPS services and XPS viewer.
- To check if the PDF error got resolved, reopen QuickBooks Desktop.
Steps to Reinstall XPS Document writer in Windows 8
- Open the Control Panel and then select the settings tab.
- Now, move to Devices & Printers.

- To remove a device, the user needs to right-click Microsoft XPS document writer and then choose Remove Device.
- Subsequently, hit on yes to confirm the change.
- Click Add a printer in the toolbar and choose to Add a local printer/network print with manual settings.
- Choose PORTPROMPT- local port from the menu.
- Select Next.
- From the manufacturer list, click Microsoft and choose Microsoft XPS document writer v4.
- Choose the Replace the current driver option after clicking Next.
- Select Next once again.
- Bring out version 4 right away, and make sure it says Microsoft XPS document writer.
- Select Finish.
For Windows 7 and Vista users:
The steps listed below can be used to reinstall the XPS document writer on Windows 7 and Vista:
- Go to Drivers and Printers from the start menu.
- Select the Remove Device option after right-clicking MS XPS document writer.
- Now, hit on Yes.
- Click on Add a local after selecting Add a printer from the toolbar.
- The next action is to select Use an existing port from the menu.
- Next, choose XPSPort- the local port and press the Next button.
- After that, go to Microsoft, select Microsoft XPS Document Writer, and then hit on Next.
- Herein, the user is required to Replace the current driver.
- Once the aforementioned procedures have complied, restart QuickBooks to determine if the PDF file error has been fixed.
Solution 4: Avoiding print spooler
- The user needs to first head to the printer management panel.
- After that, right-click Microsoft XPS document writer and opt for the printer properties.
- Select print directly to the printer by clicking on the advanced option.
- To save the changes, the user needs to click on OK.
- Shut off printer properties.
- Open QuickBooks Desktop once more to see if the problem that was preventing PDF files from being created has been resolved. If not, move on to the following solution.
Solution 5: Delete the Invoice Template Logo
The logo can be removed from the invoice design or substituted with a.bmp file. To put this approach into practice, follow the directions below.
- Click on the Gear button in the toolbar when QuickBooks Desktop is already open.
- Choose Custom Form Styles from the Company menu.
- Determine which template needs to be changed.
- Go to the Action column and choose the Edit option.
- Select Make Logo Edits under the Design tab.
- Then, opt for Hide logo and then hit on Done.
Winding Up!
We wind up hoping that the information in this post helped you achieve your goals and resolve QuickBooks Cannot Create PDF File warning message. If you run into further problems, get in touch with our QuickBooks Technical Support Team.
Apart from this, if you want to know about Remove QuickBooks Closing Entry then please visit our Tech category


